About Job Actions
This section describes the user interface for each job action.
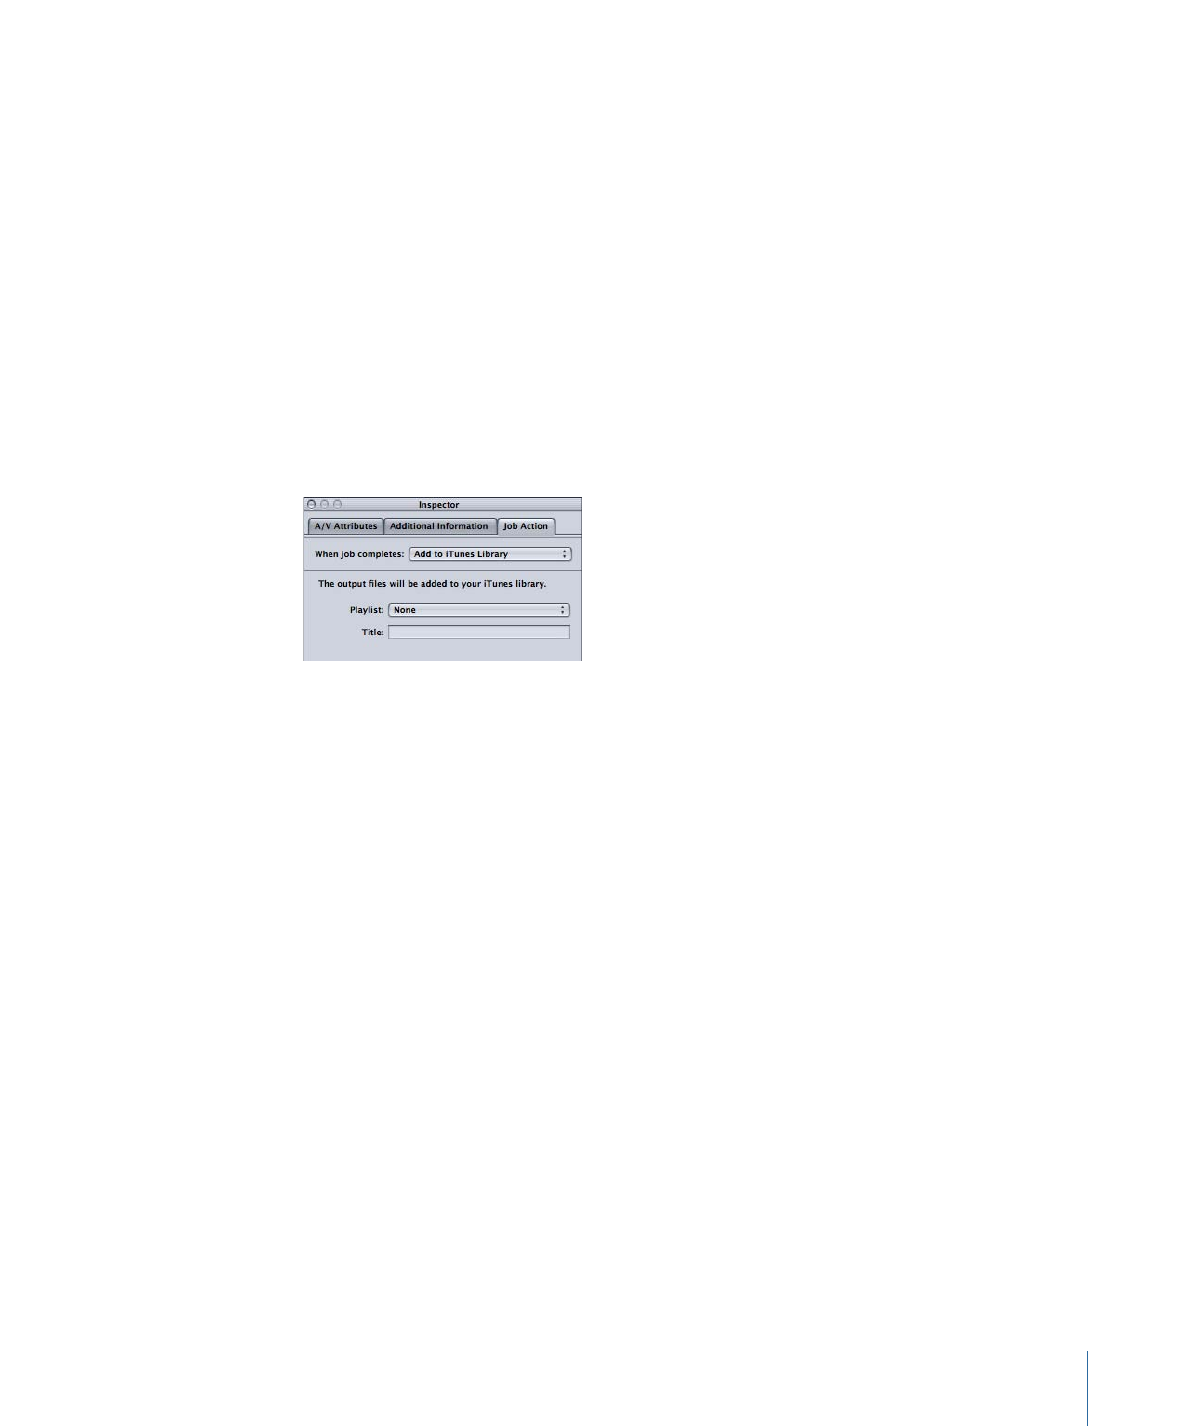
Add to iTunes Library
Use this form to automatically add output media files to iTunes.
• Playlist pop-up menu: Use the Playlist pop-up menu to add the output media file to a
particular playlist in your iTunes library.
Note: The first time you use this feature, this pop-up menu will be empty. To populate
this menu with playlists from your iTunes library, choose Refresh from the Playlist
pop-up menu.
• Title: Enter the text you want to appear as the title of the file in your iTunes library.
291
Chapter 25
Adding Actions
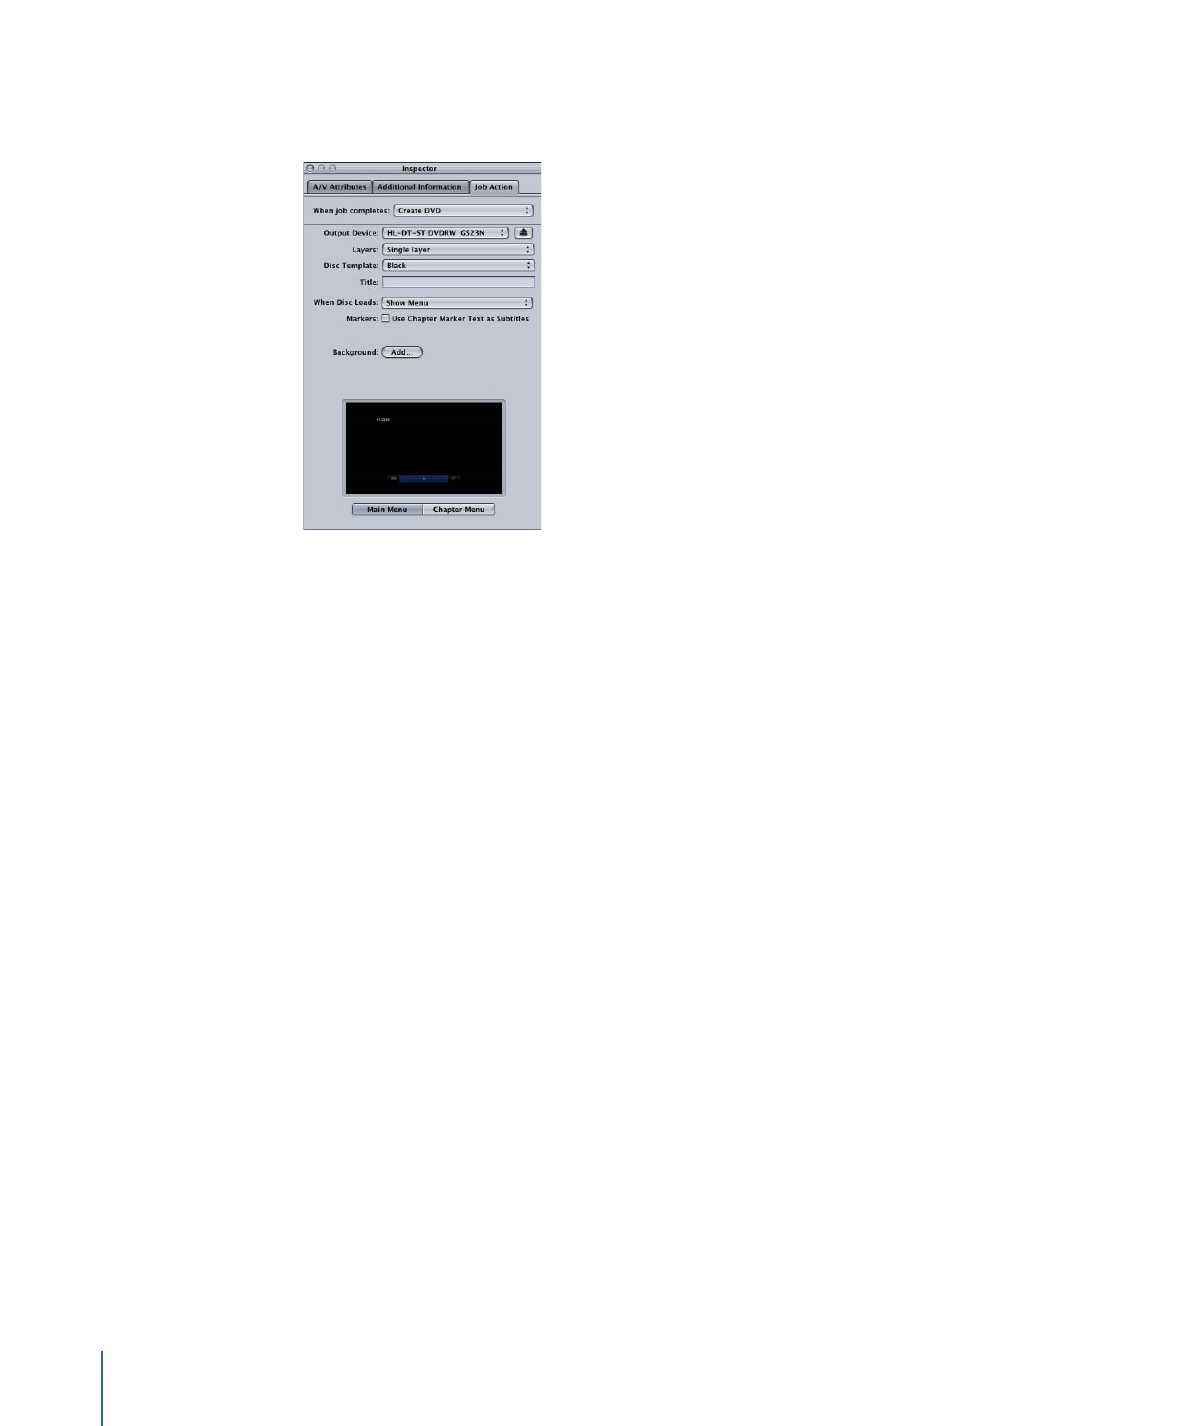
Create DVD
Use this form to enter information and settings for the DVD you want to burn.
• Output Device pop-up menu: Use this pop-up menu to choose the device to format to.
The pop-up menu displays a list of your system’s suitable output devices, including
optical drives and the computer’s hard disk. Choose Hard Drive to create a disk image
(.img) file that you can burn to DVD media at a later time using the Disk Utility
application (available in the Utilities folder). Other settings may change depending on
the device you choose.
Important:
If a progress indicator appears next to the output device you selected, wait
a moment for the list of available devices to update. This can happen when you eject
or insert a disc or when you turn an optical drive on or off.
• Eject button: Depending on your optical media drive type, click this button to eject
optical media from the drive or open the drive’s media tray.
• Layers pop-up menu: Use this pop-up menu to specify the type of disc you are making.
• Automatic: Use this to have the type of disc you insert to be automatically detected.
You must insert the disc before clicking Burn for Automatic to work. Additionally,
Automatic always creates a single-layer disk image when Hard Drive is selected as
the output device.
• Single-layer: Use this to identify the disc as a single-layer disc. You can use this to
force a dual-layer disc to be treated as a single-layer disc.
• Dual-layer: Use this to identify the disc as a dual-layer disc. You can use this to force
the disk image to be formatted for a dual-layer disc when you choose Hard Drive as
your output device. Selecting “Dual-layer” when using a single-layer disc may result
in an error while burning the disc, depending on the project’s length.
• Disc Template pop-up menu: Use this pop-up menu to choose a menu template for the
DVD.
292
Chapter 25
Adding Actions

• Title field: Use this field to enter a name for the program on the DVD.
• When Disc Loads pop-up menu: Use this pop-up menu to choose what happens when
the disc loads in the player.
• Show Menu: Choose this option to show the menu.
• Play Movie: Choose this option to play the movie.
• Use Chapter Marker Text as Subtitles checkbox: Select this checkbox to have marker text
appear as subtitles. This is particularly useful for creating DVD dailies. This allows you
to line up a series of clips or scenes and identify each item with a marker text-subtitle.
• Background pop-up menu: Opens a dialog for you to locate and select a still image to
use as the menu’s background.
• Main Menu and Chapter Menu preview: Use the Main Menu and Chapter Menu buttons
to display previews of the menus included with the selected template.
Create Blu-ray Disc
Use this form to enter information and settings for the Blu-ray disc you want to burn.
Additionally, you can burn an AVCHD disc based on settings in this form.
An AVCHD disc can be thought of as a simpler HD disc that is burned to red laser media.
The resulting disc plays in Blu-ray Disc players that are compatible with the AVCHD format.
This means that you can burn a disc that contains HD video content and some basic
menu features using a standard DVD burner and play that disc in compatible Blu-ray Disc
players. See
About the H.264 for Blu-ray Disc Encoder Pane
for information on creating
H.264 streams suitable for Blu-ray discs and AVCHD discs.
Important:
You cannot play any disc containing Blu-ray content on a Mac computer.
293
Chapter 25
Adding Actions
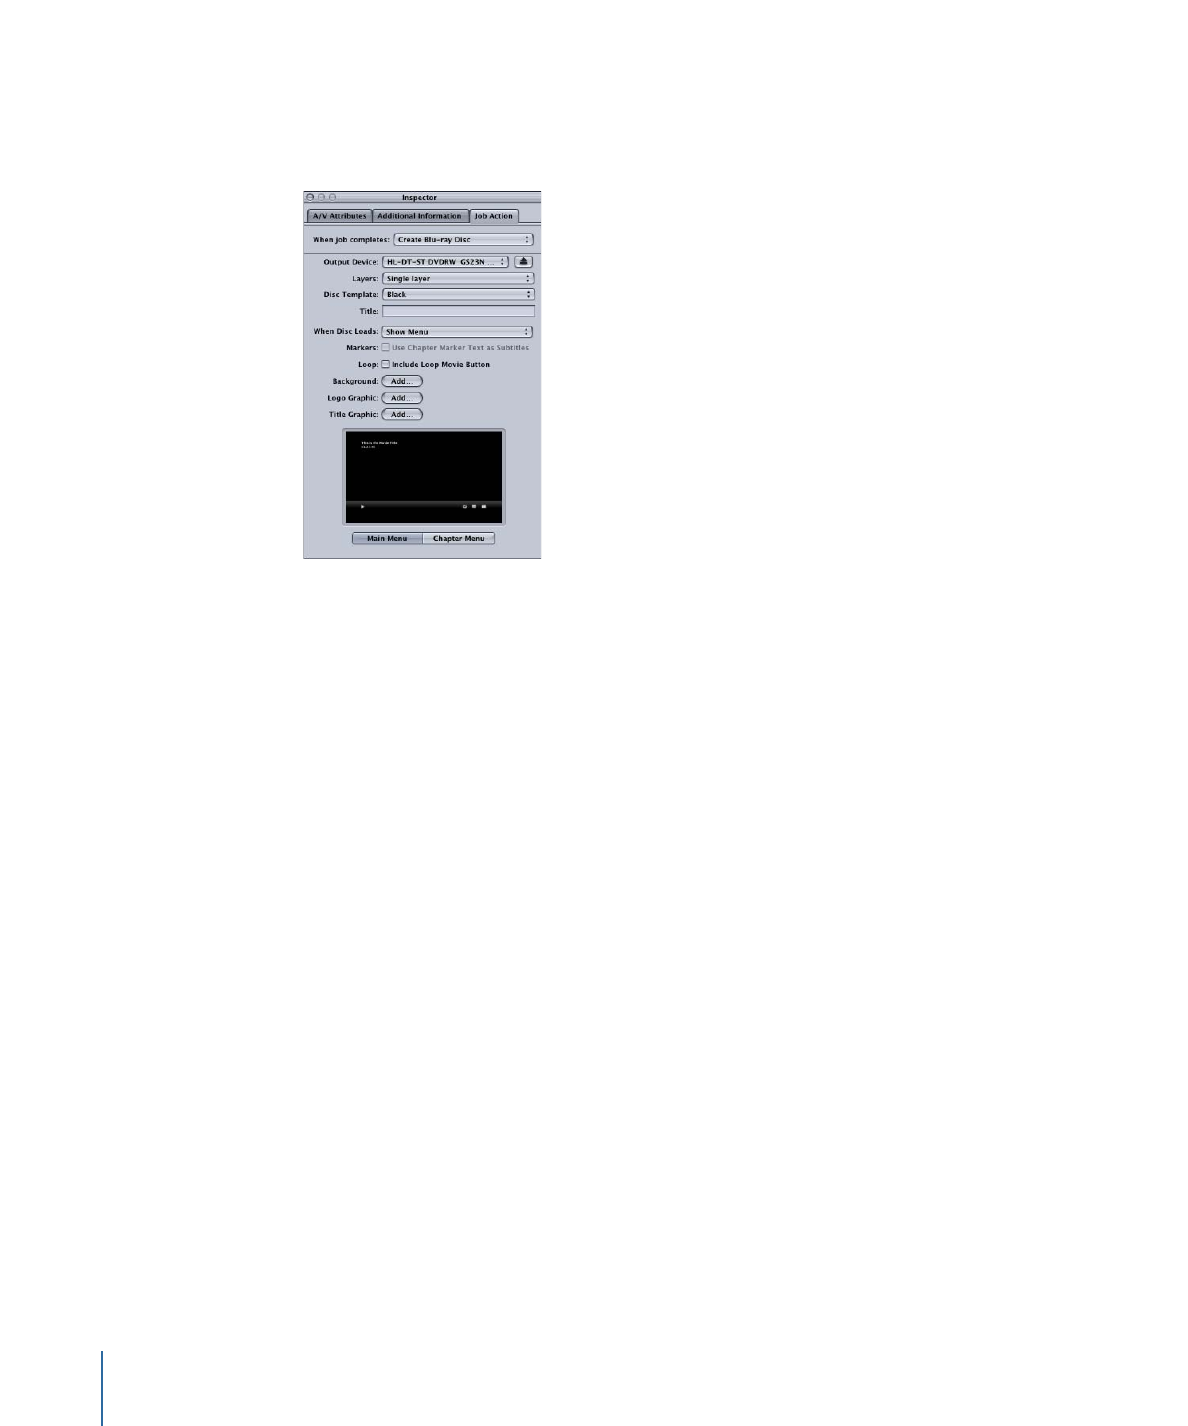
You choose whether to burn a Blu-ray disc or an AVCHD disc by your choice in the Output
Device pop-up menu. The setting descriptions below identify which items do not apply
to AVCHD discs.
• Output Device pop-up menu: Use this pop-up menu to choose the device to format to.
The pop-up menu displays a list of your system’s suitable output devices, including
optical drives and the computer’s hard disk. Each device also includes the words Blu-ray
or AVCHD to indicate which type of disc it creates. Choose Hard Drive to create a disk
image (.img) file that you can burn to Blu-ray disc media at a later time using the Disk
Utility application (available in the Utilities folder). Other settings may change depending
on the device you choose.
Important:
If a progress indicator appears next to the output device you selected, wait
a moment for the list of available devices to update. This can happen when you eject
or insert a disc or when you turn an optical drive on or off.
Note: If you choose a standard DVD burner, the disc is formatted as an AVCHD disc.
All other devices format the disc as a Blu-ray disc.
• Eject button: Depending on your optical media drive type, click this button to eject
optical media from the drive or open the drive’s media tray.
• Layers pop-up menu: Use this pop-up menu to specify the type of disc you are making.
• Automatic: Use this to have the type of disc you insert to be automatically detected.
You must insert the disc before clicking Burn for Automatic to work. Additionally,
Automatic always creates a single-layer disk image when Hard Drive is selected as
the output device.
• Single-layer: Use this to identify the disc as a single-layer disc. You can use this to
force a dual-layer disc to be treated as a single-layer disc.
294
Chapter 25
Adding Actions

• Dual-layer: Use this to identify the disc as a dual-layer disc. You can use this to force
the disk image to be formatted for a dual-layer disc when you choose Hard Drive as
your output device. Selecting “Dual-layer” when using a single-layer disc may result
in an error while burning the disc, depending on the project’s length.
• Disc Template pop-up menu: Use this pop-up menu to choose a menu template for the
Blu-ray disc.
• Title field: Use this field to enter a name for the program on the Blu-ray disc.
• When Disc Loads pop-up menu: Use this pop-up menu to choose what happens when
the disc loads in the player.
• Show Menu: Choose this option to show the menu.
• Play Movie: Choose this option to play the movie.
• Use Chapter Marker Text as Subtitles checkbox: Select this checkbox to have marker text
appear as subtitles. This is particularly useful for creating Blu-ray disc dailies. This allows
you to line up a series of clips or scenes and identify each item with a marker
text-subtitle.
Note: Subtitles are not supported on AVCHD discs.
• Include Loop Movie Button checkbox: Select this checkbox to add a Loop Movie button
to the menu. This option is not available on all disc templates.
• Background button: Opens a dialog for you to locate and select a background graphic.
• Logo Graphic button: Opens a dialog for you to locate and select a logo graphic.
• Title Graphic button: Opens a dialog for you to locate and select a title graphic.
• Main Menu and Chapter Menu preview: Use the Main Menu and Chapter Menu buttons
to display previews of the menus included with the selected template.
Note: Blu-ray and AVCHD menus are best suited for display at 1080i or 1080p
resolutions. Users should ensure that their player and display are set accordingly.
295
Chapter 25
Adding Actions
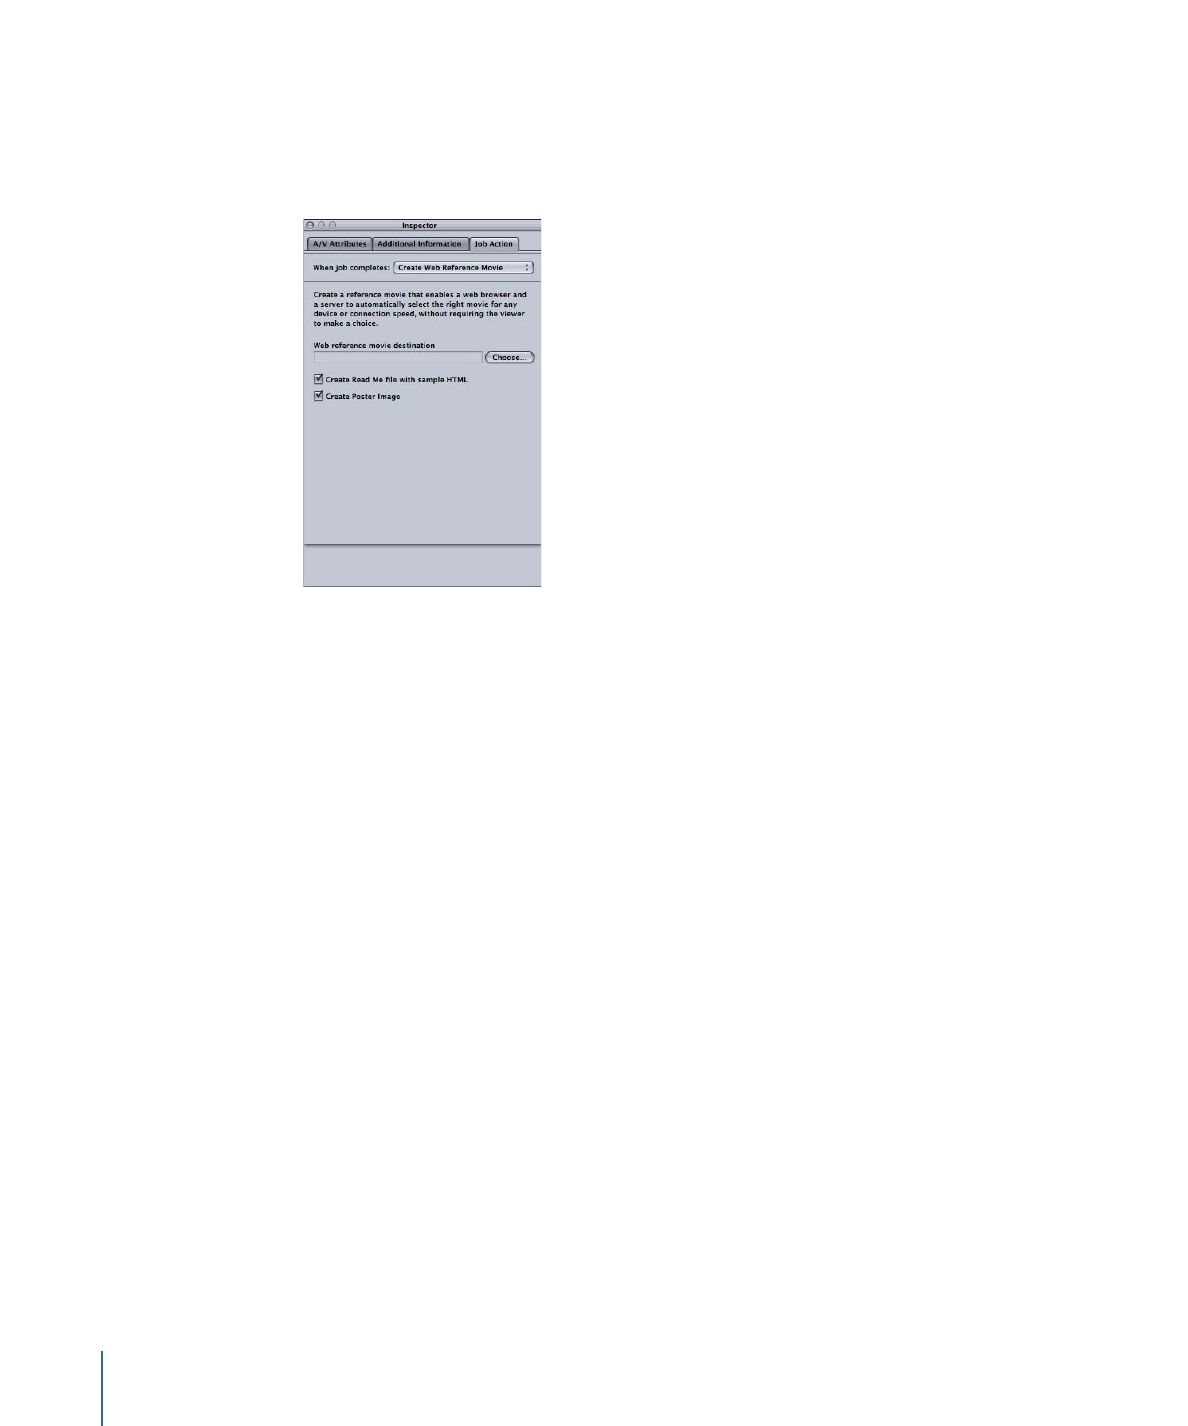
Create Web Reference Movie
Use this form to create a reference movie that enables a web browser and a server to
automatically select the right movie for any device or connection speed, without requiring
the viewer to make a choice.
• Web reference movie destination field and button: Use this field and the associated Choose
button to define a destination folder for the output web reference movie. Click the
button to open a dialog for locating and selecting the folder.
• Create Read Me file with sample HTML checkbox: Use this checkbox to control whether
Compressor creates a text document containing complete instructions and sample
HTML for embedding the web reference movie in a web site.
• Create Poster Image checkbox: Use this checkbox to control whether Compressor creates
a thumbnail image for embedding the web reference movie in a web site.
296
Chapter 25
Adding Actions
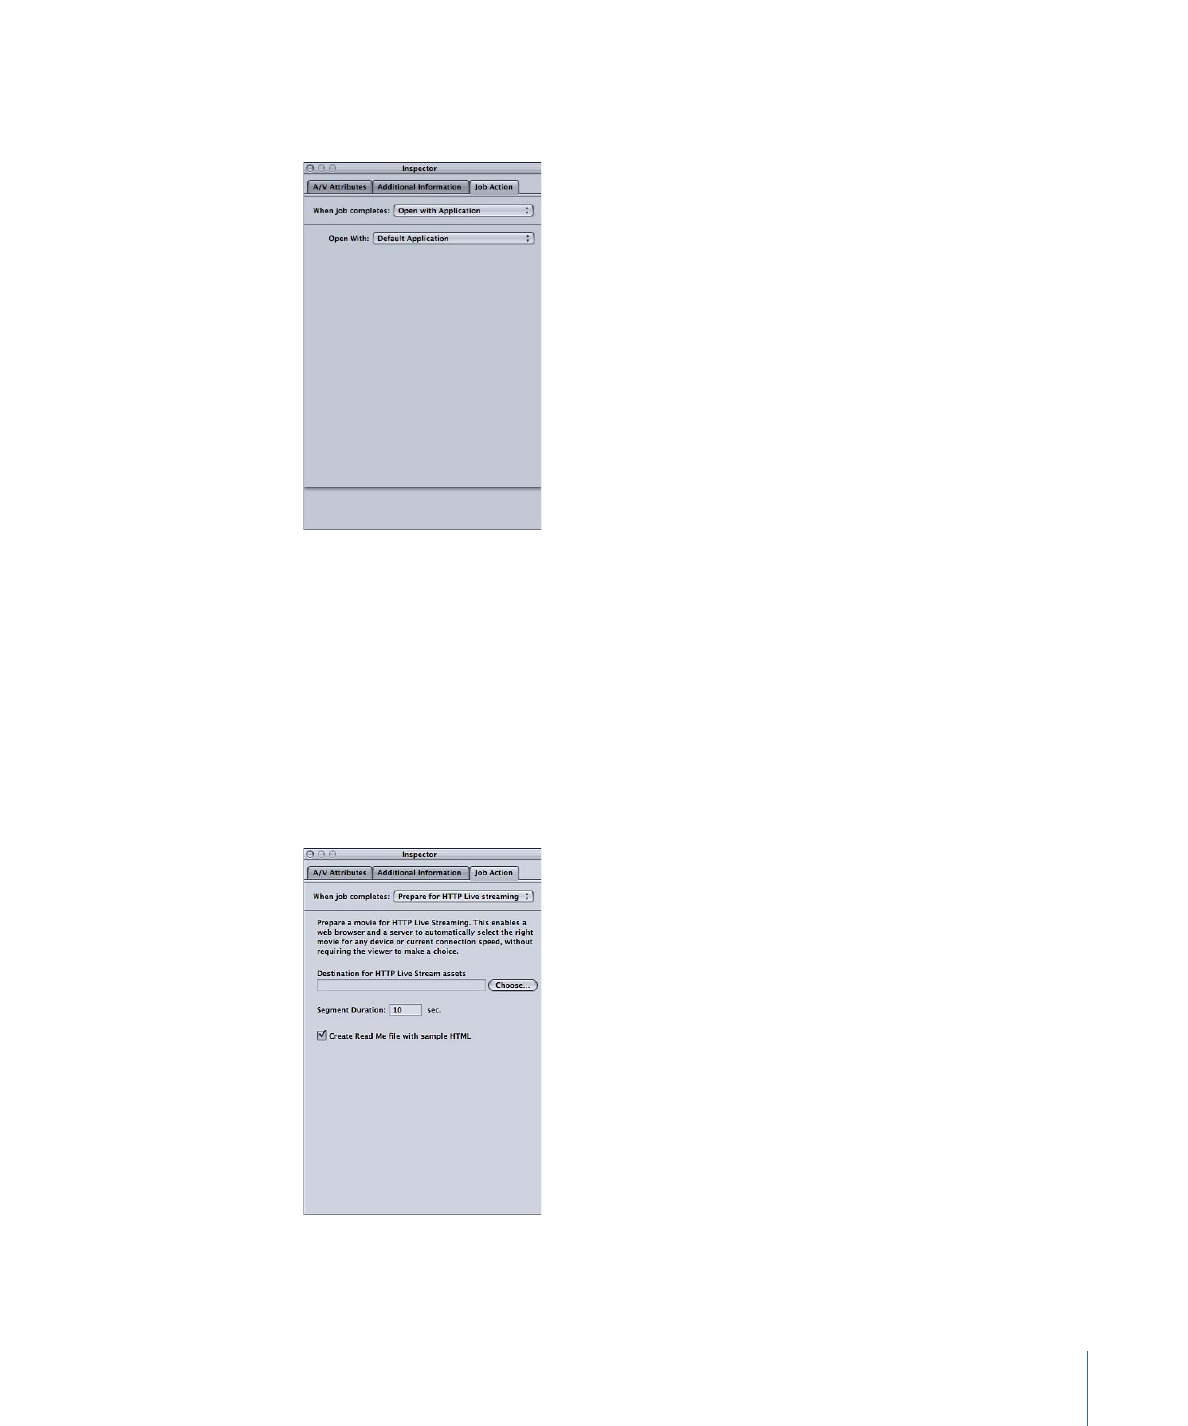
Open with Application
Use this form to specify an application to open the output media file.
• Open With pop-up menu: Use this menu to either confirm or select the application that
will open the output media file.
Prepare for HTTP Live streaming
Use this form to create a set of files you can use to stream audio and video to iPad, iPhone,
iPod touch, and Mac, using an ordinary web server. Designed for mobility, HTTP live
streaming can dynamically adjust movie playback quality to match the available speed
of wired or wireless networks. HTTP live streaming is great for delivering streaming media
to your iOS-based application or HTML5-based website. For detailed information on
implementing HTTP live streaming, see the
Apple Developer HTTP live streaming
website.
• Choose button: Click Choose to open a dialog for locating a destination for the HTTP
live streaming assets.
297
Chapter 25
Adding Actions
• Segment Duration number field: Enter a value (in seconds) to define the segment lengths
for the media. This value defines how the video streams are split into chunks. This
segmentation defines when the web server can switch between the various video
formats while streaming to a device with varying network connection speeds. A smaller
value allows the server to respond more quickly to changing connection speeds.
• Create Read Me file with sample HTML checkbox: Select this to include a file with basic
HTTP live streaming usage information.
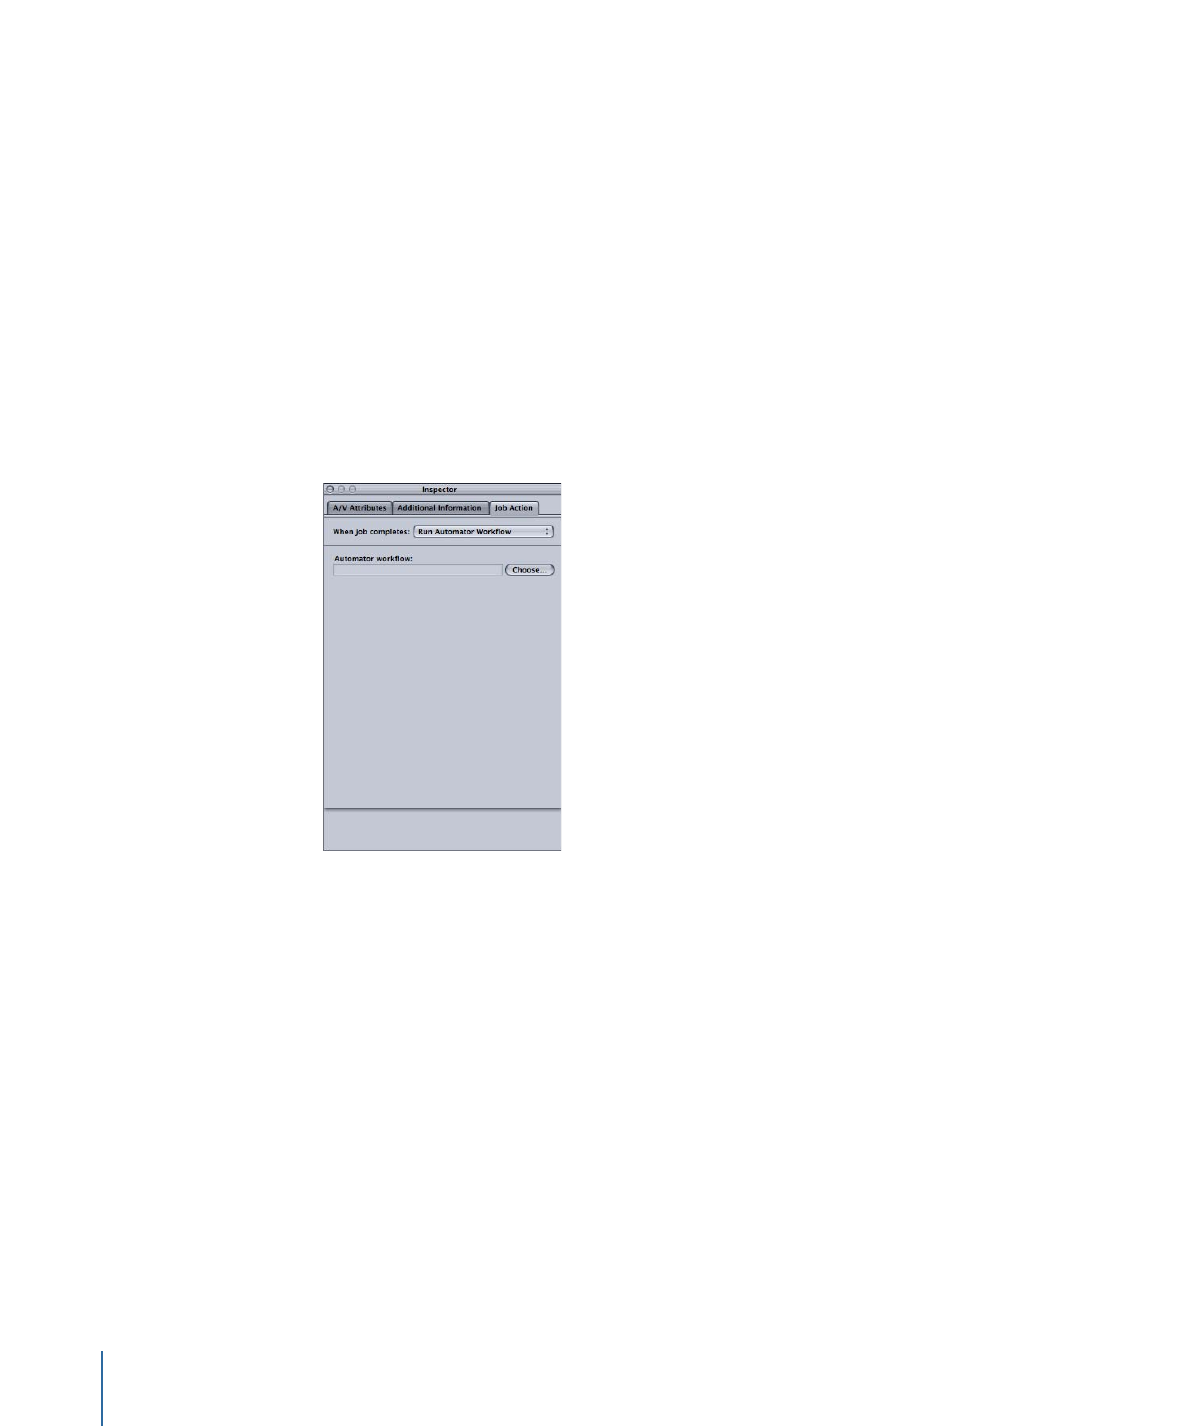
Run Automator Workflow
Use this form to choose an Automator script to run.
• Choose Automator Workflow: Click Choose to open a dialog for locating and selecting
an Automator script that Compressor will execute automatically on completion of the
transcoding job.
Publish to YouTube
Use this form to enter information about movies you want to publish to a YouTube
account on the web.
298
Chapter 25
Adding Actions
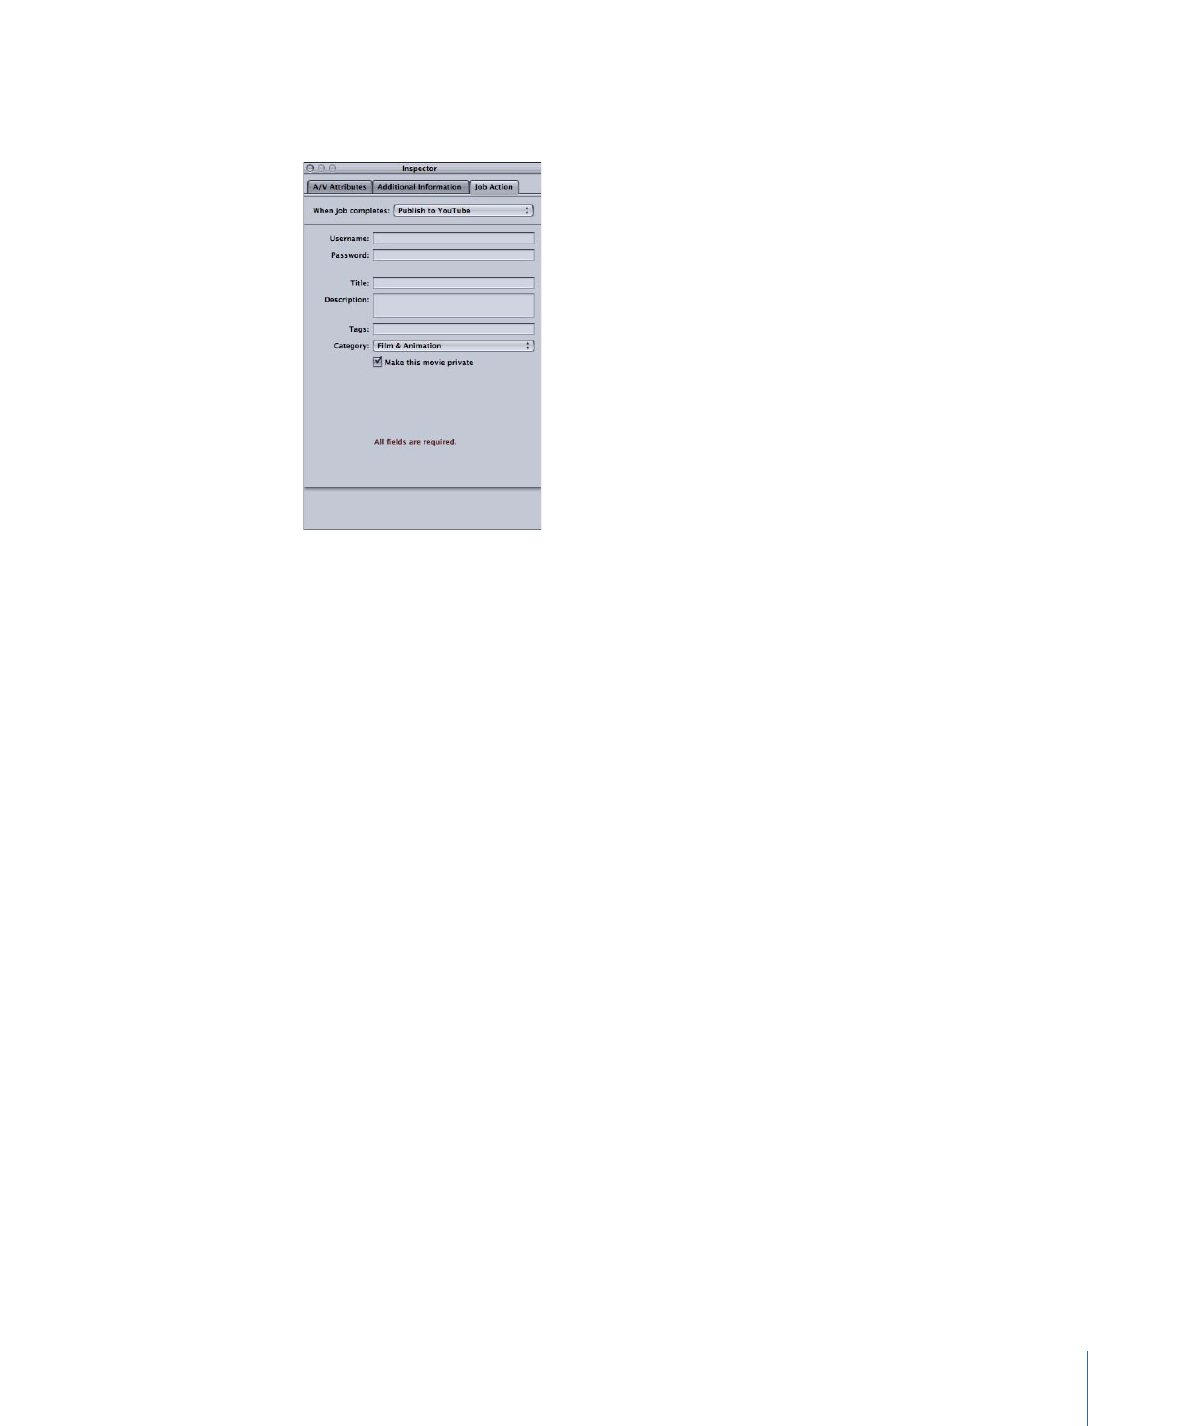
Note: To upload multiple YouTube output media files in one batch, create a separate job
for each output media file.
Important:
You must complete all fields for successful uploading.
• Username: Use this field to enter a YouTube username.
• Password: Use this field to enter a YouTube password.
• Title: Use this field to enter the name of the movie you are publishing.
• Description: Use this field to enter a description of the movie you are publishing.
• Tags: Use this field to enter keywords that describe your movie. These are search terms
that your intended audience might use to find your movie on YouTube. For more
information, see YouTube help.
• Category pop-up menu: Use this pop-up menu to select a YouTube category for your
movie. On YouTube, a movie can belong to one of several categories (topic areas).
• Make this movie private checkbox: Select this checkbox to control viewing access to the
movie you are publishing. When you make a video private on YouTube, you have the
option of sharing it with a select number of people from any of the contact lists you
create for your account. See YouTube help for more information.
Publish to Facebook
Use this form to enter information about movies you want to publish to a Facebook
account on the web.
299
Chapter 25
Adding Actions
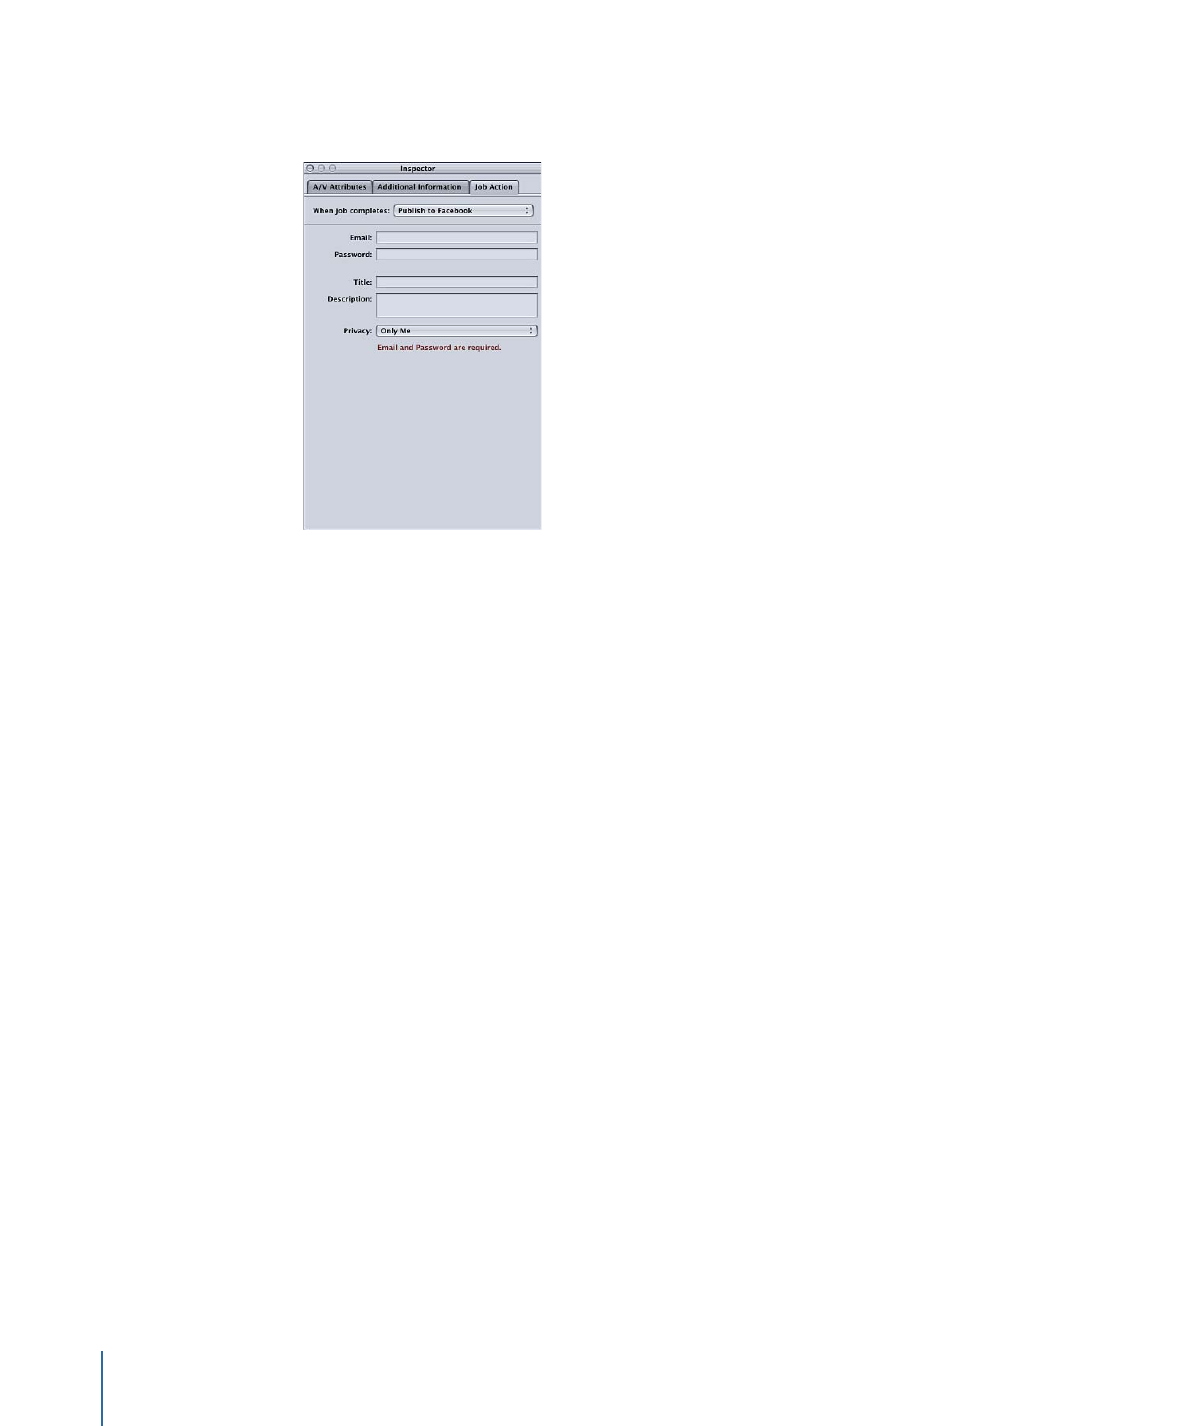
Note: To upload multiple Facebook output media files in one batch, create a separate
job for each output media file.
Important:
You must complete all fields for successful uploading.
• Email: Use this field to enter the email address for a Facebook account.
• Password: Use this field to enter a Facebook password.
• Title: Use this field to enter the name of the movie you are publishing.
• Description: Use this field to enter a description of the movie you are publishing.
• Privacy pop-up menu: Use this pop-up menu to choose who can view the movie. The
choices are Only Me, Friends, Friends of Friends, and Public.
Publish to Vimeo
Use this form to enter information about movies you want to publish to a Vimeo account
on the web.
300
Chapter 25
Adding Actions

Note: To upload multiple Vimeo output media files in one batch, create a separate job
for each output media file.
Important:
You must complete all fields for successful uploading.
• Email: Use this field to enter the email address for a Vimeo account.
• Password: Use this field to enter a Vimeo password.
• Title: Use this field to enter the name of the movie you are publishing.
• Description: Use this field to enter a description of the movie you are publishing.
• Tags: Use this field to enter keywords that describe your movie. These are search terms
that your intended audience might use to find your movie on Vimeo. For more
information, see Vimeo help.
• Viewable by pop-up menu: Use this pop-up menu to choose who can view the movie.
The choices are Anyone, My contacts, and Nobody else.
Publish to CNN iReport
Use this form to enter information about movies you want to publish to a CNN iReport
account on the web.
301
Chapter 25
Adding Actions
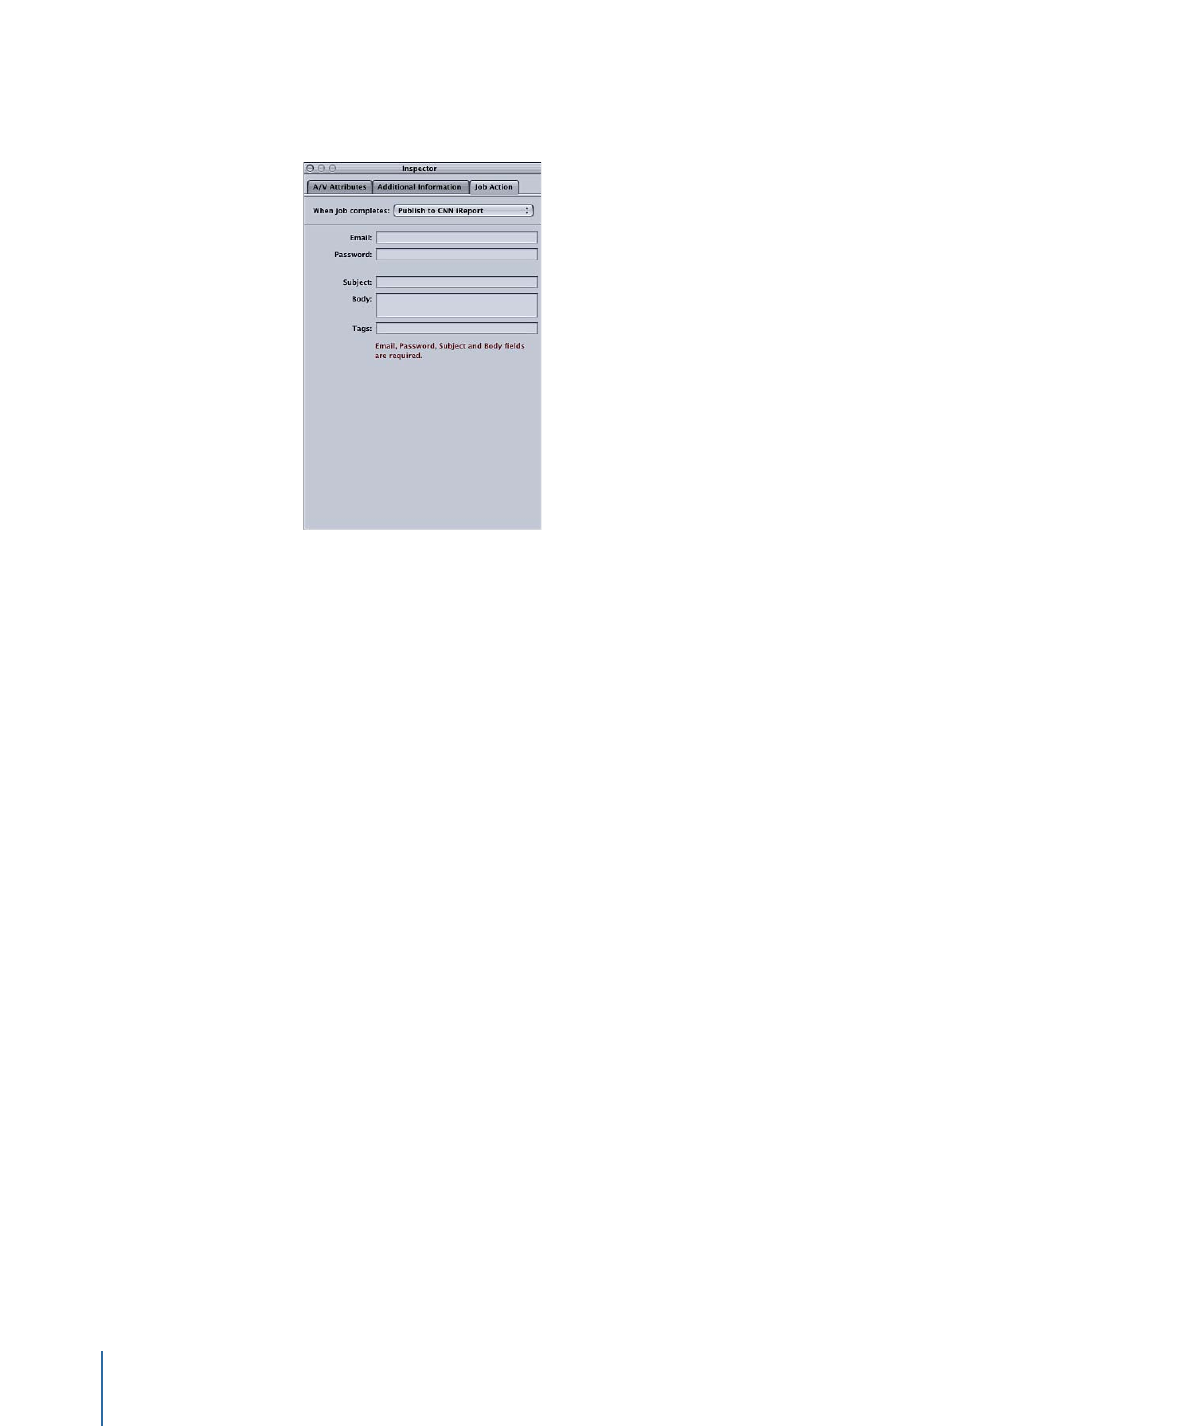
Note: To upload multiple CNN iReport output media files in one batch, create a separate
job for each output media file.
Important:
You must complete all fields for successful uploading.
• Email: Use this field to enter the email address for a CNN iReport account.
• Password: Use this field to enter a CNN iReport password.
• Subject: Use this field to enter the name of the movie you are publishing.
• Body: Use this field to enter a description of the movie you are publishing.
302
Chapter 25
Adding Actions
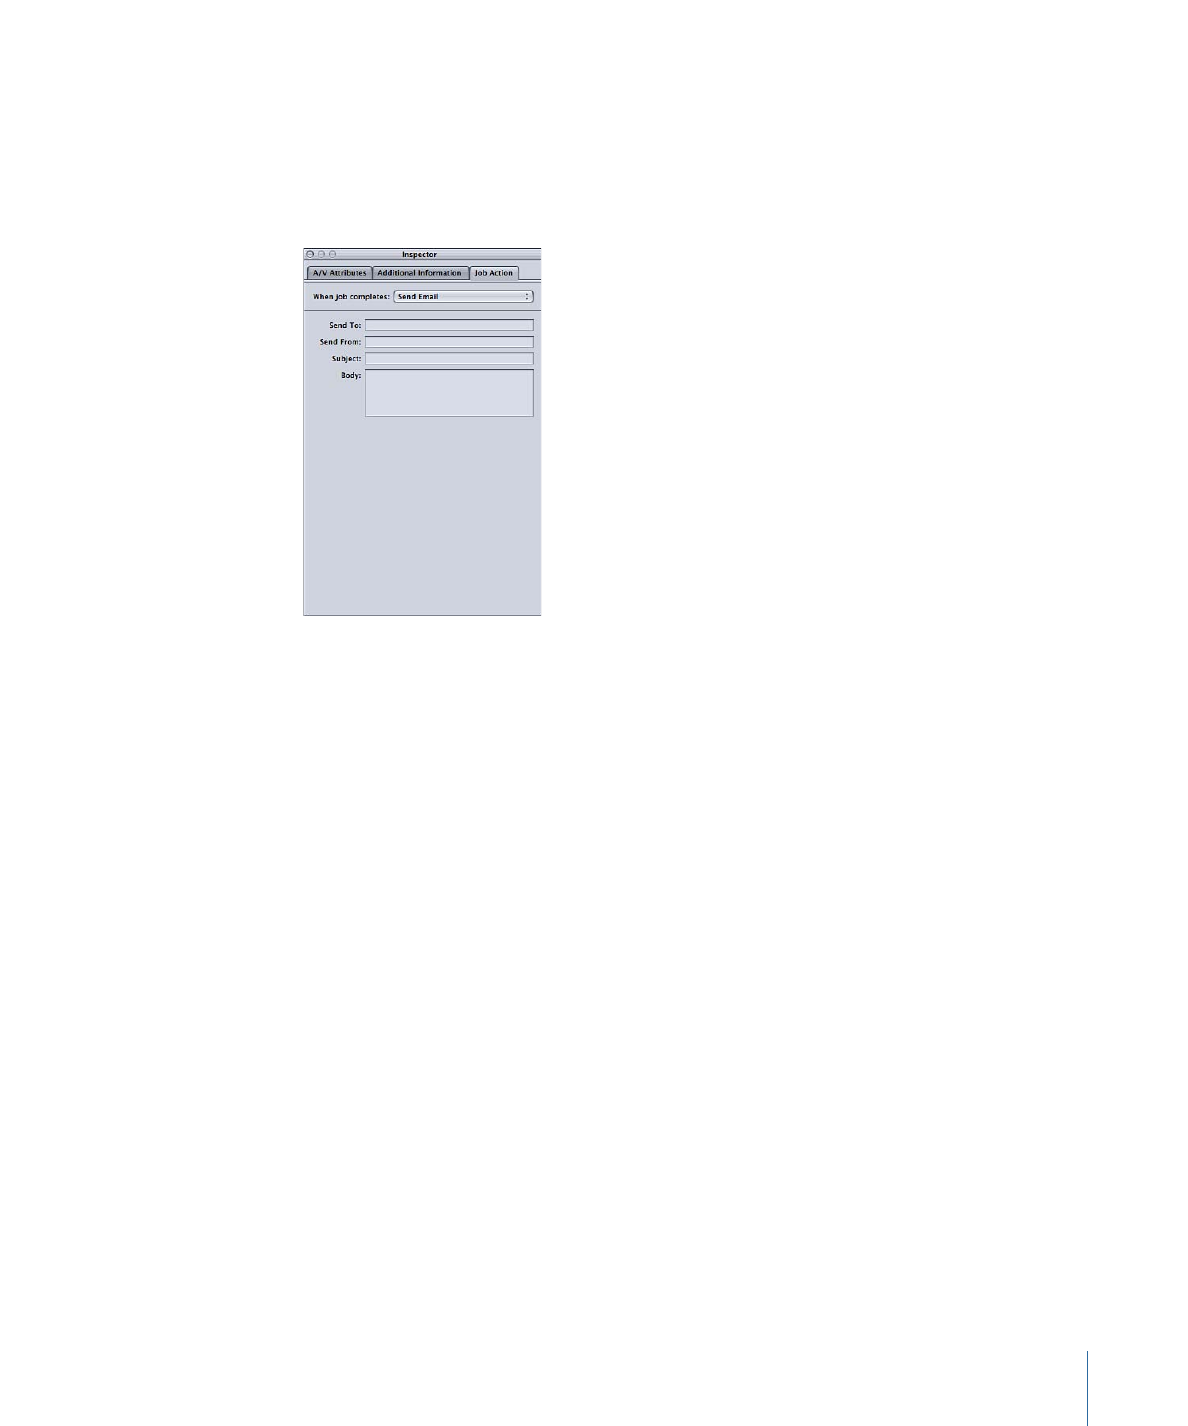
Send Email
Use this form to enter information for an email that is composed when the job completes.
This email contains the actual output file and opens in Mail so that you can further edit
the email’s contents and other settings. Once you are done editing the email, you can
click Send.
• Send To: Enter the email address to where you want the email to be sent. You can enter
multiple email addresses, separated by a comma.
• Send From: Enter the email address you want the email to be sent from.
• Subject: Use this field to enter the email’s subject.
• Body: Use this field to enter the email’s text.
303
Chapter 25
Adding Actions

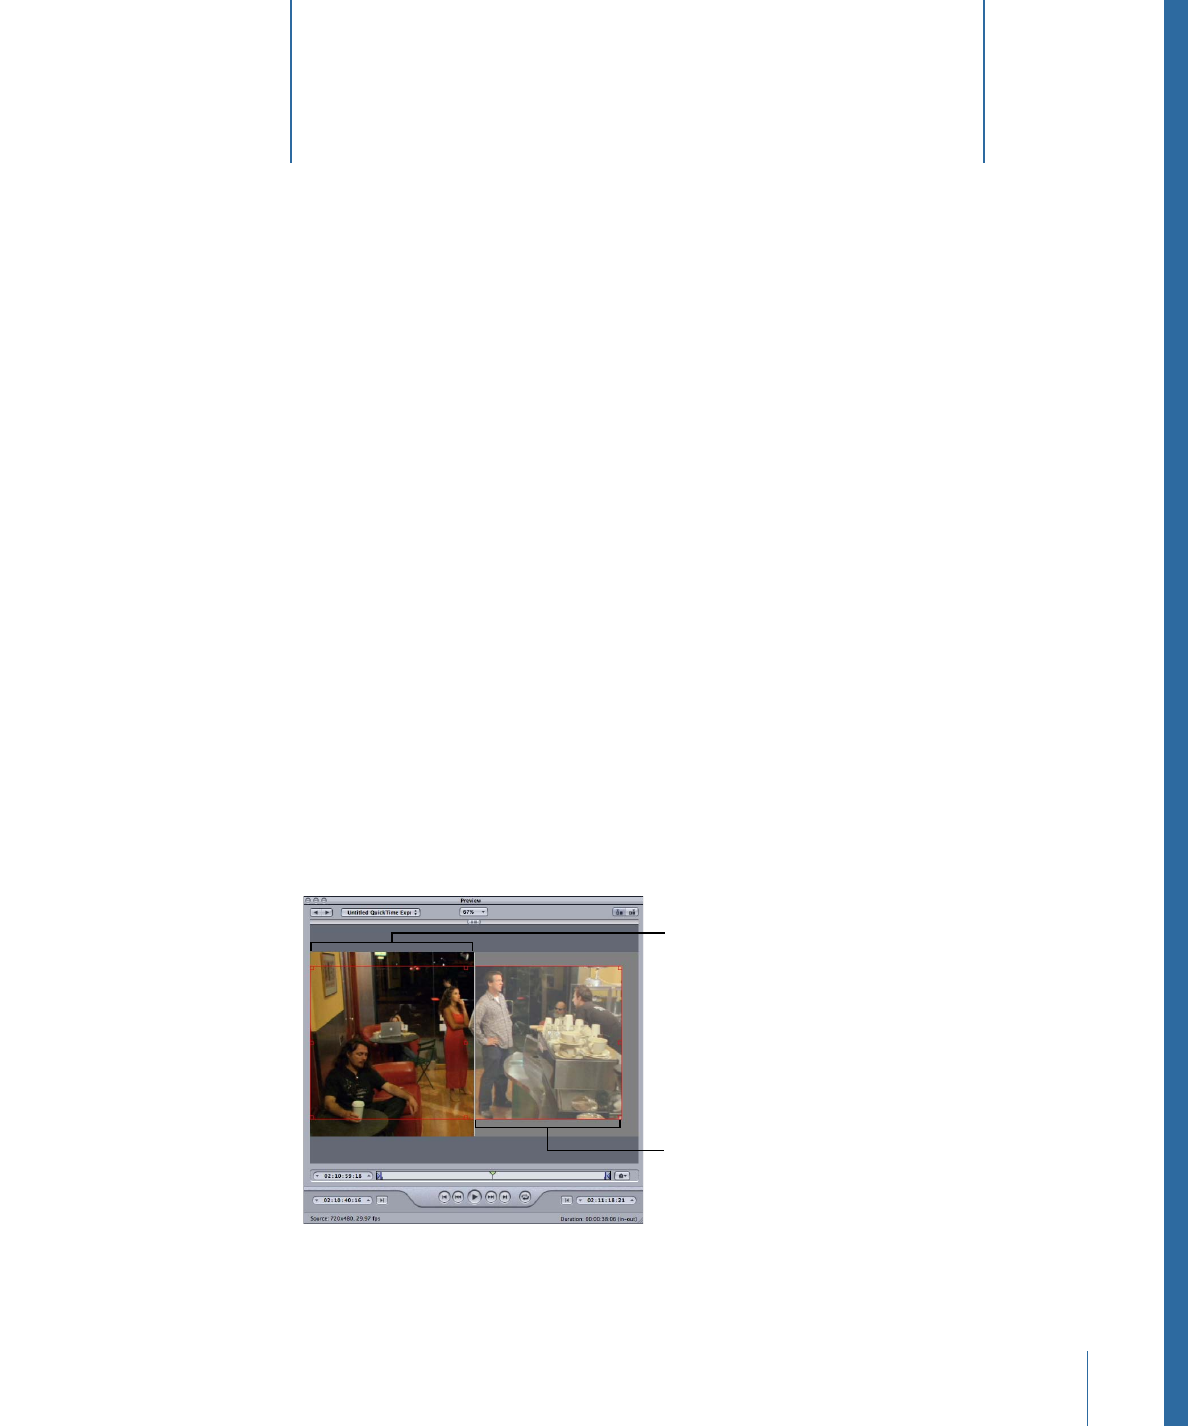
The Preview window has two main roles. You can use it to play your source media file in
its original format, or you can preview your source media file with whichever settings
have been assigned to it.
This chapter covers the following:
•
About the Preview Window
(p. 305)
•
Previewing a Clip
(p. 311)
•
Transcoding a Portion of the Clip with the Preview Window
(p. 316)
•
Working with Markers and Poster Frames
(p. 317)
•
About the Preview Window Keyboard Shortcuts
(p. 324)
About the Preview Window
When you use the Preview window to compare the original version of the clip with the
version that will be output, you can make and view real-time changes. This comparison
lets you check the effects of settings on your file before spending time and resources
transcoding it. Do this to check the quality of the output media file.
Scaled, cropped, and
filtered version of the clip
Original version
of the clip
305