
About the Droplet Window
You can open any Droplet to view its full details as well as add, remove, and modify
settings and source media files. You can also modify the filenames for the output media
files using the Filename Template and change the destination folder for the output media
files that the Droplet will create.
336
Chapter 28
Using Droplets
See
About the Destinations Tab
for more information on using file identifiers.
Destination
pop-up field
“Show window on
startup” checkbox
Submit button
Source files table
Individual jobs
Jobs table
Job Type
Filename Template
Action checkbox
(only present for some
job types)
Job type identifier
Show Info button
Add Output and Remove
Output buttons
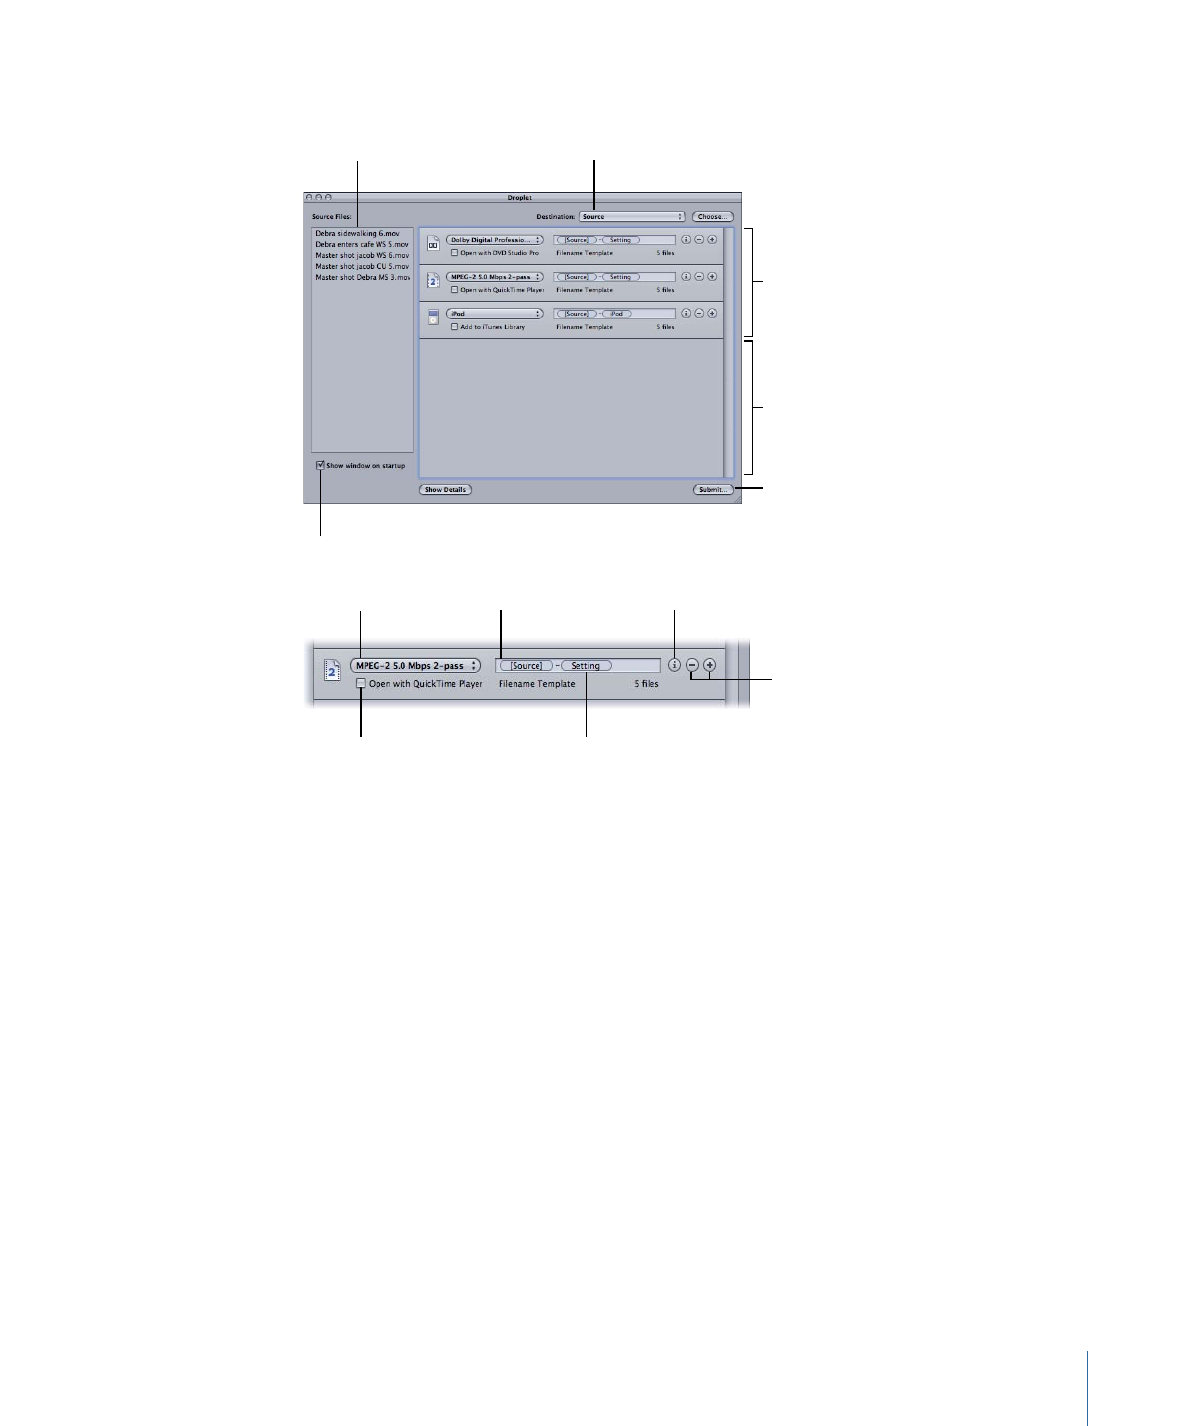
The Droplet window contains the following items.
• Destination: This field displays the destination for the output media file. You can modify
this by clicking it and choosing a destination defined in Compressor, or by clicking the
Choose button to open the Destination Location dialog and choosing a folder.
• Source Files: Contains a list of all the jobs in the batch about to be submitted. If the
“Show window on startup” checkbox is selected, the Droplet window opens after you
drag your source media files to the Droplet icon, and all the source media files appear
in the Source Files table. You can drag one or more source media files into this table,
and they will all be transcoded together when you submit the batch, just like a normal
batch submission from the Batch window.
• Job Type pop-up menu: Use this pop-up menu to select the type of output media file.
The choices are: Apple TV, Blu-ray, DVD, iPhone, iPod, YouTube, and Other. The Other
option opens a dialog in which you can choose from a list of existing Compressor
settings. For a complete description of each these job types, see
Quick and Easy
Compressor Workflow: Batch Template Method
and
About Job Actions
.
337
Chapter 28
Using Droplets

• Jobs table: Each job in this table represents a separate media file that will be generated
from each item in the Source files list.
• Filename Template: Compressor automatically enters a filename in this field for the
output media file. The first part of the filename is based on the source file name.
Compressor also automatically appends an output type identifier (such as “iPod” or
“YouTube”) at the end of the filename. You can manually edit any portion of the filename
by double-clicking it.
• Job type identifier: Compressor automatically appends an output type identifier (such
as “iPod” or “YouTube”) at the end of each filename. You can manually edit any output
type identifier by double-clicking it.
• Add/Remove Output buttons: Click Add Output to create additional outputs. To remove
a particular output, click its Remove Output button.
• Show Info button: Click this button to display extensive details about the current setting
and the output media file. If you are transcoding multiple source files, you can view
information about each individual media file.
• Action checkbox: Select this checkbox to activate any post-transcoding actions (beyond
simply creating the output media file). For more information, see
Adding Job Actions
.
• Show window on startup checkbox: When this checkbox is selected, the Droplet window
opens when you drag source media files to the Droplet icon, before the batch is
submitted. This allows you to verify the settings contained within the Droplet. If the
checkbox is not selected, the batch is submitted as soon as the batch is dragged to
the Droplet icon (as long as there are no errors), and the Droplet window doesn’t open.
• Submit: Click this button to open the submit dialog and submit the batch. For more
information about submitting, see
Using a Droplet to Transcode Source Media Files
and
Submitting a Batch
. You only need to do this if the “Show window on startup”
checkbox is selected; if this checkbox is not selected, the batch is submitted
automatically.